|
Embedded System - Raspberry Pi |
||
|
WiFi
Raspberry Pi3 B+ that I am using comes with WiFi module by default. But it doesn't seem to be easy to activate the WiFi. I read through many pages and youTubes to make this work, but none of the single page nor single YouTube solved my problem. Probably the operating system that I flashed as of Aug 2018 might not be mature enough for WiFi. If you try with the later version or different OS from what I am using(RASPBIAN) , you may be able to activate WiFi directly from GUI.
What I am posting here is what is working with my Raspberry Pi. You may be able to activate it directly from GUI and does not need to do this kind of complicated process.
< Step 1 >
First, edit /etc/network/interfaces file. I used nano editor. Open up the interfaces file using following command # sudo nano /etc/network/interfaces I added the parts as in yellow rectangle shown below.
< Step 2 >
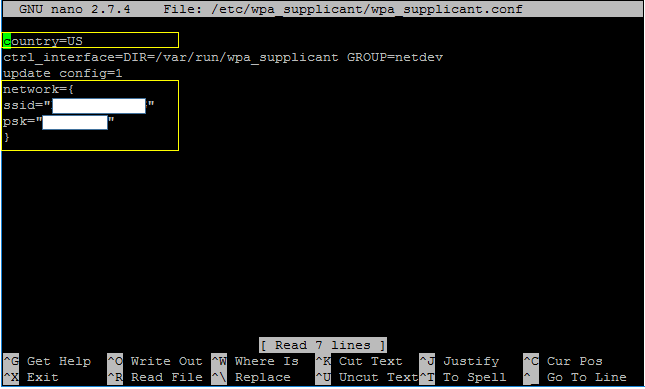
First, edit /etc/wpa_supplicant/wpa_supplicant.conf file. I used nano editor. Open up the interfaces file using following command # sudo nano /etc/wpa_supplicant/wpa_supplicant.conf I added the parts as in yellow rectangle shown below. You need put the proper SSID and Password for your Wifi in the part marked in white.
NOTE :
Depending on what kind of Access Point(e.g, WiFi modem that your ISP provides) you used, the setting shown above may work or may not work. I tried this another type of Access Point and it didn't work with this setup. After struggling a few hours, I noticed I have to add 'key_mgmt' item as well. Followings are an example.
country = CA // I set this since I tried this in Canada ctrl_interface=DIR=/var/run/wpa_supplicant GROUP=netdev update_config=1 network={ ssid="xxxxxxx" // put the SSID for your access point psk="xxx" // put the password for the SSID key_mgmt=WPA-PSK // set your key type. In most case, WPA-PSK would be good. }
< Step 3 >
Reboot the Raspberry Pi
< Step 4 >
Do 'ifconfig' and see if the wlan interface is assigned with an IP as shown below. NOTE : You would have different IP in your WiFi network.
If you are connecting the your PC and Raspberry Pi in the same network, this would be enough. But if you want to get access to internet (like browsing to public network like google.com etc), this may not be enough. In this case, do one extra step as follows.
< Step 5 >
Add the default Gateway provided by your ISP as shown below. You need to know of the default Gateway address of your WiFi network.
# route add default gw 192.168.0.1 wlan0
If you are completely new to this kind of toys like Raspberry Pi, it may be a little challenging to configure WiFi setup on your own but still you want to connect to Raspberry Pi over WiFi so that you don't need any extra monitor and keyboard. In this section, I will show you a case where you get access to Raspberry Pi that is already configured with WiFi by someone else.
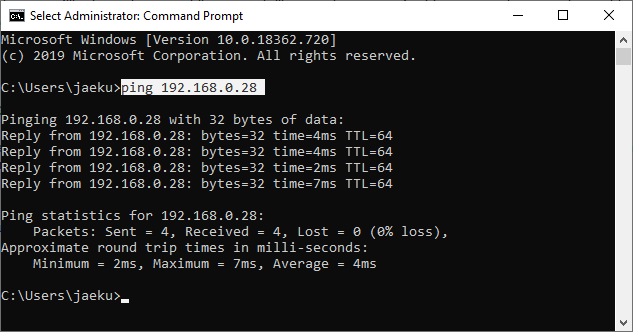
Step 1 : Ask for the IP address that is assigned to Raspberry Pi WiFi. (Let's assume that the IP address is 192.168.0.28).
Step 2 : Check if you can ping to the Raspberry Pi. If you get the ping reply as shown below, it mean your PC can get access to the Pi.
Step 3 : Download PuTTy program here and install it.
Step 4 : SSH to Raspberry Pi as shown in this tutorial.
Step 5 : Try to create a simple C program and run it as shown in this tutorial.
Reference :
[1]
|
||