Python - GUI - Tab
In this note, I will show you how to create a simple tab. It is not a fancy / fully functioning program. It is just to how to create a tab and put several components on each of the taps and resize the components as the dialogbox resizes.
For learning purpose, let's first take a look at the list of packages (modules) that I am going to use in the program.
- tkinter: Tkinter is Python's standard graphical user interface (GUI) package. It is the most commonly used way of creating windows, dialogs, buttons, and all sorts of other elements that you'd typically see in a desktop application. If you've ever wanted to create an application with a graphical interface in Python, tkinter is likely the module you'll use.
- ttk (tkinter.ttk): This is a submodule of tkinter. ttk stands for 'themed tkinter', which provides access to the Tk themed widget set. These widgets have a more modern and attractive look than the original tkinter widgets. They also automatically adjust to the platform's look and feel, making your applications more flexible and visually appealing.
Now let's take a brief overview on various objects and their functionality that are used in the script. Try to understand this high level functionality and then go through the script. It would be much easier to understand the script.
- tk.Tk(): This is used to create a main window by initializing the Tk instance of the application.
- tk.title(): This is used to set the title of the main window.
- ttk.Notebook(): This is a container for holding and managing other widgets in a notebook style, where each child widget is associated with a tab.
- ttk.Notebook.add(): This is used to add new tabs to the notebook. The first argument is the child widget to be added, and the text keyword argument specifies the text to be displayed on the tab.
- ttk.Frame(): This is a widget used as a container to organize other widgets.
- ttk.Label(): This widget is used to display text or images.
- .grid(): This is a geometry manager that organizes widgets in a grid-like structure in their parent widget. It uses column, row notations to place the widgets.
- tk.Text(): This is used to create a multi-line text field, allowing the user to enter and edit text.
- .columnconfigure() and .rowconfigure(): These are methods used to control the behavior of the grid columns or rows. They take an index and a weight that determines how the column or row should respond to window resizing.
- .pack(): This is a geometry manager that organizes widgets in horizontal and vertical boxes. Unlike grid, it doesn’t allow as much control over the widgets' position.
- tk.mainloop(): This starts the event loop, which listens for events like button clicks or key presses, and reacts to these events
Now let's dive into the source code. It would be helpful to understand the code if you have understanding on overall usage of the program. One good approach would be just to run the script and use the program first according to the following instructions and then look into the source code. Followings are brief operation manual for this program.
|
Script (GUI_tkinter_Tab.py) |
|
import tkinter as tk from tkinter import ttk
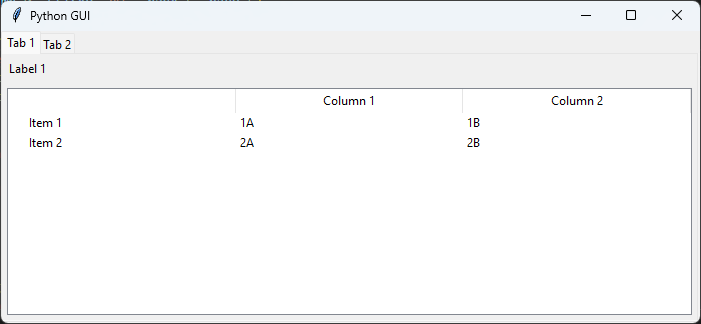
# This function adds content to the first tab in the Tkinter window. It creates a label and a Treeview widget. # The Treeview is configured with two columns, and two rows of data are inserted into it. The grid layout manager # is used to position the widgets, and the last row and column are configured to expand when the window is resized. # def create_tab1(parent): # Create some labels and Treeview label1 = ttk.Label(parent, text="Label 1") label1.grid(row=0, column=0, sticky="ew", padx=5, pady=5)
tree = ttk.Treeview(parent) tree["columns"] = ("one", "two") tree.heading("one", text="Column 1") tree.heading("two", text="Column 2") tree.insert('', 'end', text="Item 1", values=("1A", "1B")) tree.insert('', 'end', text="Item 2", values=("2A", "2B")) tree.grid(row=1, column=0, columnspan=4, sticky="nsew", padx=5, pady=5)
# Configure the row and column to resize parent.columnconfigure(0, weight=1) parent.rowconfigure(1, weight=1)
# This function adds content to the second tab in the Tkinter window. Two pairs of labels and textboxes are created # and positioned using the grid layout manager. The second column, which contains the textboxes, is configured to # expand when the window is resized, allowing the textboxes to expand horizontally.
# def create_tab2(parent): # Create invisible widget of 100 pixels width reference = tk.Frame(parent, height=1, width=100)
# Create some labels and textboxes label1 = ttk.Label(parent, text="Label 1") label1.grid(row=0, column=0, sticky="ew")
text1 = tk.Text(parent, height=1) text1.grid(row=0, column=1, sticky="ew", padx=5)
label2 = ttk.Label(parent, text="Label 2") label2.grid(row=1, column=0, sticky="ew")
text2 = tk.Text(parent, height=1) text2.grid(row=1, column=1, sticky="ew", padx=5)
# Configure the columns to resize parent.columnconfigure(1, weight=1)
def main():
# Initializes the root window for the application win = tk.Tk()
# Sets the title of the root window to "Python GUI" win.title("Python GUI")
# Creates a notebook widget (for tabs) in the root window tabControl = ttk.Notebook(win)
# Creates the first frame (container) for the first tab tab1 = ttk.Frame(tabControl)
# Adds the first frame as a tab in the notebook with the label 'Tab 1' tabControl.add(tab1, text='Tab 1')
# Calls the function to populate the first tab with its content create_tab1(tab1)
# Creates the second frame (container) for the second tab tab2 = ttk.Frame(tabControl)
# Adds the second frame as a tab in the notebook with the label 'Tab 2' tabControl.add(tab2, text='Tab 2')
# Calls the function to populate the second tab with its content create_tab2(tab2)
# Adjusts the notebook to fill the root window tabControl.pack(expand=1, fill="both")
# Enters the main event loop (starts the application) win.mainloop()
if __name__ == "__main__": main()
|
| Result |
|
|