Python - GUI
In most case of Python programming, you might have written programs for command line operation. But it doesn't mean that GUI programming is not possible with Python. Pythod DOES has GUI programming capability.
When you're programming a GUI in Python, you're making a visual interface for your app. This helps users to interact with your program more easily. You can create windows, buttons, labels, and other things that users can click or type into. This is important for making your app look nice and work well on different computers, like Windows, macOS, and Linux.
- Basic things you need to know of GUI programming
- Various types of GUI
- Component Layout
- Event Handler
- Table
- Treeview
Basic things you need to know of GUI programming
To make a GUI in Python, you need to learn how to use a library that helps with this. You'll design how your app should look, and then connect the buttons and other parts to your program. This way, when users click or type, your app knows what to do.
You also need to handle events, which are things like button clicks or key presses. When an event happens, you'll update your app to show the right information or do the right action. This takes careful planning and coding to make sure everything works smoothly.
When you learn about creating GUI programming, there are some of common features / functionalities you may need to implement. Of course, not all GUI program would require all of these features but it would be good at least to know about general logic of these features.
- Making windows: Learn how to create the main window for your app and smaller windows for things like messages or choosing files.
- Arranging items/elements: Understand how to place buttons, labels, and other parts of your app so they look good and work well. Get to know different parts of a GUI, like buttons, labels, text boxes, and sliders, and learn how to put them in your app
- Responding to actions: Learn how to make your app do something when users click buttons or press keys, by connecting these actions to functions in your code. Simply put, you need to know how to implement even handler for each items/elements that you added.
- Getting user input: Understand how to get information from users, like what they type or choose, and use it in your app.
- Changing the app: Learn how to update your app when users do something, like changing text or showing new information.
- Checking for errors: Learn how to make sure users enter the right information and show them helpful messages when there's a problem.
- Making menus: Understand how to create and customize menus and toolbars to give users more options.
- Saving settings: Learn how to remember users' choices, like window size or colors, and use them the next time they open your app.
- Supporting different languages: Get to know how to change your app's language and design so it works well for people in different countries.
Python offers various GUI libraries to help you create graphical user interfaces for your applications. Each library has its unique features and advantages, making them suitable for different types of projects
In this section, I will show you a very simple 'hello world' example for various GUI packages just to give you a basic idea of different packages.
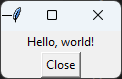
Tkinter is a built-in GUI library for Python that is easy to learn and simple to use. It is an ideal choice for small projects or beginners who are starting to create graphical user interfaces. Tkinter allows you to create windows, buttons, labels, and other basic widgets quickly. However, its features and appearance may be limited compared to other, more advanced libraries.
| Script |
|
import tkinter as tk
def close_window(): root.destroy()
# Create the main window (also called the root window) root = tk.Tk()
# Set the title of the window root.title("My Simple GUI")
# Create a label widget and add it to the main window label = tk.Label(root, text="Hello, world!") label.pack()
# Create a button widget, set its command to close_window, and add it to the main window button = tk.Button(root, text="Close", command=close_window) button.pack()
# Run the main event loop to display the window and handle user interactions root.mainloop() |
| Result |
|
|
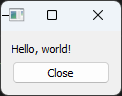
PyQt is a powerful and feature-rich library for creating complex and professional-looking applications. Based on the Qt framework, it provides a wide range of tools and options for GUI development. It may take more time and effort to learn at the beginning comparing to Tkinter, PyQt is well-suited for larger projects or more advanced users who need additional functionality. With PyQt, you can create modern and customizable user interfaces for desktop and mobile platforms.
| Script |
|
from PyQt5.QtWidgets import QApplication, QWidget, QVBoxLayout, QLabel, QPushButton import sys
class MyApp(QWidget): def __init__(self): super().__init__()
# Set up the user interface self.init_ui()
def init_ui(self): # Create a QVBoxLayout to manage layout layout = QVBoxLayout()
# Create a label widget with the text "Hello, world!" label = QLabel("Hello, world!") layout.addWidget(label)
# Create a button widget with the text "Close" button = QPushButton("Close") layout.addWidget(button)
# Connect the button's clicked signal to the close method button.clicked.connect(self.close)
# Set the layout for the window self.setLayout(layout)
# Set the window title self.setWindowTitle("My Simple GUI")
# Main function to start the PyQt application def main(): app = QApplication(sys.argv) my_app = MyApp() my_app.show() sys.exit(app.exec_())
if __name__ == '__main__': main() |
| Result |
|
|
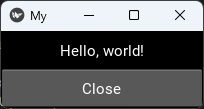
Kivy is a versatile and cross-platform GUI library designed for creating responsive and touch-enabled applications. It is particularly useful for developing apps that run on multiple platforms, such as Windows, macOS, Linux, Android, and iOS. Kivy has a unique approach to UI design, relying on its own language called KV for defining the appearance and layout of widgets. This makes it easier to create scalable and adaptable interfaces. Kivy might be more challenging to learn than Tkinter, but it offers a powerful set of tools for building modern applications
| Script |
|
from kivy.app import App from kivy.uix.boxlayout import BoxLayout from kivy.uix.label import Label from kivy.uix.button import Button
class MyApp(App): def build(self): layout = BoxLayout(orientation='vertical')
label = Label(text='Hello, world!') layout.add_widget(label)
button = Button(text='Close') button.bind(on_release=self.close_app) layout.add_widget(button)
return layout
def close_app(self, *args): self.stop()
if __name__ == '__main__': MyApp().run() |
| Result |
|
|
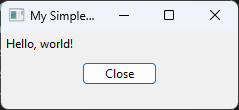
wxPython is a GUI library based on the native widgets of the operating system, which means that your application will have a native look and feel. It is a solid choice for developing desktop applications that need to work well on Windows, macOS, and Linux. wxPython offers a wide range of standard and advanced widgets, making it suitable for various types of projects. While it might not be as easy to learn as Tkinter, it provides more flexibility and a more professional appearance.
| Script |
|
import wx
class MyFrame(wx.Frame): def __init__(self): super().__init__(None, title='My Simple GUI')
panel = wx.Panel(self)
sizer = wx.BoxSizer(wx.VERTICAL)
label = wx.StaticText(panel, label='Hello, world!') sizer.Add(label, 0, wx.ALL | wx.EXPAND, 5)
button = wx.Button(panel, label='Close') button.Bind(wx.EVT_BUTTON, self.on_close) sizer.Add(button, 0, wx.ALL | wx.CENTER, 5)
panel.SetSizer(sizer)
def on_close(self, event): self.Close()
if __name__ == '__main__': app = wx.App() frame = MyFrame() frame.Show() app.MainLoop() |
| Result |
|
|
A layout is how you arrange things on your app's screen or window. It's about organizing items like buttons, text boxes, and labels so that your app looks nice and is easy to use. When you create a layout, you want to help users understand how to interact with your app and find what they need quickly.
In making a GUI, you use different methods to control where items go and how big they are. These methods can arrange items in rows, columns, or grids, or let you put them in specific spots on the screen. A good layout should be simple, look nice, and work well when the window size or screen resolution changes.
In Tkinter, there are three ways to arrange items in your app's window or frame. These ways are pack, grid, and place.
pack(): With pack(), you can put items one after another, either sideways or up and down. You can choose the order and add space around them.
In pack() method, you can use options like side, padx, and pady to control where items go and how much space is around them.
- side: With the side option, you choose where items go next to each other. You can use "top", "bottom", "left", or "right". If you use "top", the item goes at the top, and the next item goes below it. If you use "bottom", the item goes at the bottom, and the next item goes above it. If you use "left", the item goes on the left, and the next item goes to its right. If you use "right", the item goes on the right, and the next item goes to its left.
- padx: With the padx option, you add space on the left and right of the item. The space is measured in pixels. In the example, padx=5 means there are 5 pixels of space on the left and right of the item.
- pady: With the pady option, you add space on the top and bottom of the item. The space is measured in pixels. In the example, pady=5 means there are 5 pixels of space above and below the item
| Script |
|
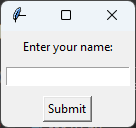
import tkinter as tk
def on_button_click(): input_text = entry.get() print("You entered:", input_text)
root = tk.Tk()
label = tk.Label(root, text="Enter your name:") label.pack(side="top", padx=5, pady=5)
entry = tk.Entry(root) entry.pack(side="top", padx=5, pady=5)
button = tk.Button(root, text="Submit", command=on_button_click) button.pack(side="top", padx=5, pady=5)
root.mainloop() |
| Result |
|
|
| Script |
|
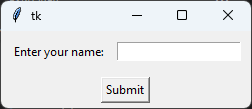
import tkinter as tk
def on_button_click(): input_text = entry.get() print("You entered:", input_text)
root = tk.Tk()
input_frame = tk.Frame(root) input_frame.pack(side="top", padx=5, pady=5)
label = tk.Label(input_frame, text="Enter your name:") label.pack(side="left", padx=5, pady=5)
entry = tk.Entry(input_frame) entry.pack(side="left", padx=5, pady=5)
button = tk.Button(root, text="Submit", command=on_button_click) button.pack(side="top", padx=5, pady=5)
root.mainloop() |
| Result |
|
|
grid(): With grid(), you can place items like they're in a table with rows and columns. You can choose which row and column each item goes in and add more space around them.
In the grid() method, the options row, column, padx, and pady are used to control the positioning and spacing of widgets.
- row: The row option determines the row number in which the widget will be placed within the grid. Rows are numbered starting from 0. In the example, row=0 means that the widget is placed in the first row of the grid.
- column: The column option determines the column number in which the widget will be placed within the grid. Columns are numbered starting from 0. In the example, column=0 means that the widget is placed in the first column of the grid.
- padx: The padx option specifies the amount of horizontal (left and right) padding around the widget, in pixels. Padding is the extra space added outside the widget, which helps visually separate it from other widgets or the edges of the parent container. In the example, padx=5 adds 5 pixels of padding to the left and right of the widget.
- pady: The pady option specifies the amount of vertical (top and bottom) padding around the widget, in pixels. Like padx, it helps visually separate the widget from other elements or the edges of the parent container. In the example, pady=5 adds 5 pixels of padding to the top and bottom of the widget.
| Script |
|
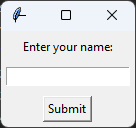
import tkinter as tk
def on_button_click(): input_text = entry.get() print("You entered:", input_text)
root = tk.Tk()
label = tk.Label(root, text="Enter your name:") label.grid(row=0, column=0, padx=5, pady=5)
entry = tk.Entry(root) entry.grid(row=1, column=0, padx=5, pady=5)
button = tk.Button(root, text="Submit", command=on_button_click) button.grid(row=2, column=0, padx=5, pady=5)
root.mainloop() |
| Result |
|
|
| Script |
|
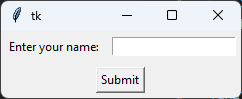
import tkinter as tk
def on_button_click(): input_text = entry.get() print("You entered:", input_text)
root = tk.Tk()
label = tk.Label(root, text="Enter your name:") label.grid(row=0, column=0, padx=5, pady=5)
entry = tk.Entry(root) entry.grid(row=0, column=1, padx=5, pady=5)
button = tk.Button(root, text="Submit", command=on_button_click) button.grid(row=1, column=0, columnspan=2, padx=5, pady=5)
root.mainloop() |
| Result |
|
|
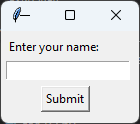
place(): With place(), you can put items exactly where you want them using x and y coordinates. You can also choose how big the items should be.
| Script |
|
import tkinter as tk
def on_button_click(): input_text = entry.get() print("You entered:", input_text)
root = tk.Tk()
label = tk.Label(root, text="Enter your name:") label.place(x=5, y=5)
entry = tk.Entry(root) entry.place(x=5, y=30)
button = tk.Button(root, text="Submit", command=on_button_click) button.place(x=40, y=55)
root.mainloop() |
| Result |
|
|
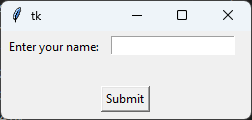
| Script |
|
import tkinter as tk
def on_button_click(): input_text = entry.get() print("You entered:", input_text)
root = tk.Tk() root.geometry("250x100")
label = tk.Label(root, text="Enter your name:") label.place(x=5, y=5)
entry = tk.Entry(root) entry.place(x=110, y=5)
button = tk.Button(root, text="Submit", command=on_button_click) button.place(x=100, y=55)
root.mainloop() |
| Result |
|
|
An event handler is like a helper that listens and responds when you do something, like clicking a button or typing on the keyboard. To create an event handler in Python, follow these steps:
Step 1 : Make a function that does what you want when the event happens. This is called the "callback function" or "event handler."
|
def when_button_clicked(): text = entry.get() print("You typed:", text) |
Here, when_button_clicked is the helper function. It takes the text you typed and shows it on the screen.
Step 2 : Connect the helper function to a part of your program, like a button or a text box, and tell it what kind of event to listen for
|
button = tk.Button(root, text="Submit", command=when_button_clicked) |
In this example, you tell the helper function when_button_clicked to listen for when the button is clicked. When that happens, it will do what you defined in the function.
For other parts of your program, like a text box, you can use a different method called bind() to connect your helper function:
|
def when_key_pressed(event): print("You pressed:", event.char)
entry = tk.Entry(root) entry.bind("<KeyPress>", when_key_pressed) |
Here, the helper function when_key_pressed listens for when you press a key in the text box. When you press a key, it will show which key you pressed.
By using event handlers, your program can react to what you do and become more interactive.
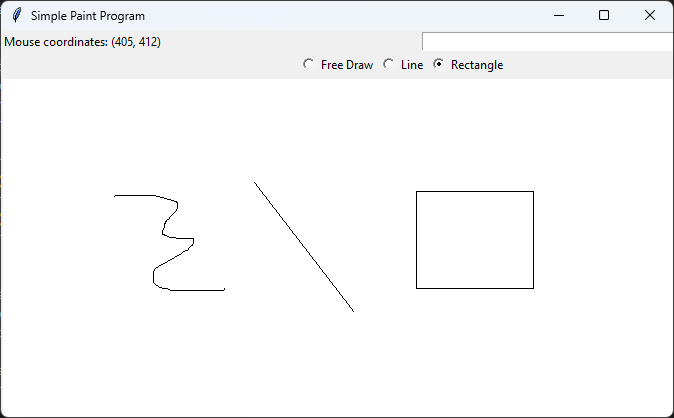
In this example, I will shows you how to use event handlers to respond to mouse events like clicks, drags, and releases.
This code implements a very simple Paint program with following features :
- 3 drawing tools:
- Free draw
- Line
- Rectangle
- Tools work differently with mouse events
- Canvas updates when using tools
- Label shows mouse position on canvas
- Tkinter's StringVar and IntVar used for pen color and width
Followings are instruction for operation :
- Click the "Free Draw" button.
- Click and hold the left mouse button on the canvas.
- Move the mouse while holding the button to draw freely.
- Release the left mouse button to stop drawing.
- Click the "Line" button.
- Click and hold the left mouse button on the canvas where you want to start the line.
- Move the mouse to the desired endpoint of the line with the left button pressed.
- Release the left mouse button to create the line.
- Click the "Rectangle" button.
- Click and hold the left mouse button on the canvas where you want to place one corner of the rectangle.
- Move the mouse to the opposite corner of the rectangle with the left button pressed..
- Release the left mouse button to create the rectangle.
a) Free Draw:
b) Line:
c) Rectangle:
- Type in a command Line(x1,y1,x2,y2) in text box and press Enter
- Type in a command Rect(x1,y1,x2,y2) in text box and press Enter
d) Command Line:
| Script |
|
import tkinter as tk
# Initialize Global Variable global current_draw current_draw = None
# This function updates the coordinates_label text to display the current mouse x and y coordinates on the canvas # when the mouse moves over it. def update_coordinates(event): coordinates_label.config(text=f"Mouse coordinates: ({event.x}, {event.y})")
# The handle_command function processes commands entered in the cmd_entry textbox, such as "Line(x1,y1,x2,y2)" # and "Rect(x1,y1,x2,y2)", to draw lines or rectangles on the canvas with the specified coordinates, pen color, and # pen width. def handle_command(): command = cmd_entry.get() if command.startswith("Line"): coordinates = command[5:-1].split(',') x1, y1, x2, y2 = map(int, coordinates) canvas.create_line(x1, y1, x2, y2, fill=pen_color.get(), width=pen_width.get()) elif command.startswith("Rect"): coordinates = command[5:-1].split(',') x1, y1, x2, y2 = map(int, coordinates) canvas.create_rectangle(x1, y1, x2, y2, outline=pen_color.get(), width=pen_width.get(), fill="")
# The on_canvas_click(event) function is triggered when the left mouse button is clicked on the canvas. It initializes # the starting x and y coordinates (start_x, start_y) for the current drawing action and creates the initial drawing # object (current_draw) based on the selected drawing tool (Free Draw, Line, or Rectangle). The drawing object is # created with the specified pen width and color. def on_canvas_click(event): global start_x, start_y, current_draw start_x = event.x start_y = event.y if mode.get() == "freedraw": current_draw = canvas.create_line(start_x, start_y, start_x, start_y, width=pen_width.get()) elif mode.get() == "line": current_draw = canvas.create_line(start_x, start_y, start_x, start_y, width=pen_width.get()) elif mode.get() == "rectangle": current_draw = canvas.create_rectangle(start_x, start_y, start_x, start_y, width=pen_width.get(), outline=pen_color.get(), fill="")
# The on_canvas_press(event) function is called when the left mouse button is pressed on the canvas. It sets the # starting x and y coordinates (start_x, start_y) for the drawing action and binds the on_canvas_drag function to # the canvas's B1-Motion event (i.e., moving the mouse while holding the left button) if the Free Draw tool is # selected. def on_canvas_press(event): global start_x, start_y start_x, start_y = event.x, event.y
if tool_var.get() == "free_draw": canvas.bind("<B1-Motion>", on_canvas_drag)
# The on_canvas_drag(event) function is called when the mouse is moved while the left button is held down on the # canvas. It handles the drawing actions for the selected tool (Free Draw, Line, or Rectangle) by updating the # current_draw object based on the current mouse position. For Free Draw, it creates a continuous line, while for # Line and Rectangle, it updates the shape's endpoint or opposite corner dynamically as the mouse moves. def on_canvas_drag(event): global start_x, start_y, current_draw if tool_var.get() == 'free_draw': if current_draw is None: current_draw = event.widget.create_line(event.x, event.y, event.x+1, event.y+1, fill=pen_color.get(), width=pen_width.get()) start_x, start_y = event.x, event.y else: event.widget.create_line(event.x, event.y, start_x, start_y, fill=pen_color.get(), width=pen_width.get()) start_x, start_y = event.x, event.y elif tool_var.get() == 'line': if current_draw: event.widget.delete(current_draw) current_draw = event.widget.create_line(start_x, start_y, event.x, event.y, fill=pen_color.get(), width=pen_width.get()) elif tool_var.get() == 'rectangle': if current_draw: event.widget.delete(current_draw) current_draw = event.widget.create_rectangle(start_x, start_y, event.x, event.y, outline=pen_color.get(), width=pen_width.get())
# The on_canvas_release(event) function is called when the left mouse button is released on the canvas. It finalizes # the drawing action for Line and Rectangle tools by creating the final shape with the starting and ending coordinates. # Additionally, it unbinds the on_canvas_drag function from the B1-Motion event to stop the drawing action. def on_canvas_release(event): end_x, end_y = event.x, event.y
if tool_var.get() == "line": canvas.create_line(start_x, start_y, end_x, end_y) elif tool_var.get() == "rectangle": canvas.create_rectangle(start_x, start_y, end_x, end_y)
canvas.unbind("<B1-Motion>")
# Create the main Tkinter window (root) and set its title to "Simple Paint Program" root = tk.Tk() root.title("Simple Paint Program")
# Create and configure the main interface elements: # i) Create a label (coordinates_label) to display mouse coordinates on the canvas, and place it in the grid layout. # ii) Create an entry widget (cmd_entry) and place it in the grid layout. # iii) Initialize tool_var (used for storing the selected drawing tool), pen_color (stores the current pen color), and # pen_width (stores the current pen width). # iv) Create a frame (tools_frame) to hold the drawing tool radio buttons and place it in the grid layout. # v) Create radio buttons for Free Draw, Line, and Rectangle tools, associate them with tool_var, and add them to # the tools_frame. # vi) Create a canvas (width: 800, height: 600) with a white background and place it in the grid layout. # coordinates_label = tk.Label(root, text="Mouse coordinates:") coordinates_label.grid(row=0, column=0, sticky="w")
cmd_entry = tk.Entry(root) cmd_entry.grid(row=0, column=1, sticky="we")
tool_var = tk.StringVar() tool_var.set("free_draw")
pen_color = tk.StringVar() pen_color.set("black")
pen_width = tk.IntVar() pen_width.set(1)
tools_frame = tk.Frame(root) tools_frame.grid(row=1, columnspan=2)
free_draw_button = tk.Radiobutton(tools_frame, text="Free Draw", variable=tool_var, value="free_draw") free_draw_button.pack(side="left")
line_button = tk.Radiobutton(tools_frame, text="Line", variable=tool_var, value="line") line_button.pack(side="left")
rectangle_button = tk.Radiobutton(tools_frame, text="Rectangle", variable=tool_var, value="rectangle") rectangle_button.pack(side="left")
canvas = tk.Canvas(root, width=800, height=600, bg="white") canvas.grid(row=2, columnspan=2)
# Bind the update_coordinates function to the canvas's Motion event, so it's called whenever the mouse moves # over the canvas canvas.bind("<Motion>", update_coordinates)
# Bind the on_canvas_press function to the canvas's Button-1 event, so it's called when the left mouse button is # pressed on the canvas canvas.bind("<Button-1>", on_canvas_press)
# Bind the on_canvas_release function to the canvas's ButtonRelease-1 event, so it's called when the left mouse # button is released on the canvas canvas.bind("<ButtonRelease-1>", on_canvas_release)
# Bind the handle_command function to the cmd_entry's Return event, so it's called when the Enter key is pressed # in the textbox cmd_entry.bind("<Return>", lambda event: handle_command())
root.mainloop() |
| Result |
|
|
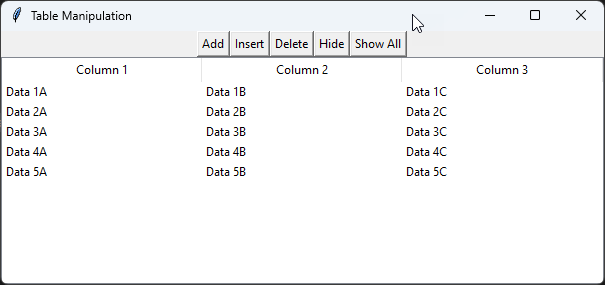
I am going to show you a script that does the following things to demonstrate basic procedures for table creation and manipulations.
1. create three buttons btnAdd (button label = "Add"), btnInsert (button label = "Insert"), btnDelete (button label =
"Delete"), btnHide (button label = "Hide") and btnShowAll (button label = "Show All")) at 1st row
2. Create a table with 3 columns and 5 rows initialized with arbitrary data
3. Create event handler for btnAdd (addRow), btnInsert(insertRow), btnDelete (deleteRow), btnHide (hideRow), btnShowAll (showAll) that does followings
i) addRow add a row at the end and fill it out with an arbitrary location
ii) insertRow insert a row at the selected location and fill it out with an arbitrary location.
(If there is no selected row, insert it at the end)
iii) deleteRow deletes a row at the selected location (If there is no selected row, delete the last row)
iv) hideRow hides the selectedRow. Do nothing if there is no selected row.
v) showAll shows all rows.
| Script |
|
import tkinter as tk from tkinter import ttk
# this is an array that will store the item when you hide it. The showAll will recover the hidden items from this array hidden_rows = []
# add a row at the end and fill it out with an arbitrary location def addRow(): table.insert("", "end", values=("Location X", "Location Y", "Location Z"))
# insert a row at the selected location and fill it out with an arbitrary location. (If there is no selected row, # insert it at the end) def insertRow(): selected_item = table.focus() if selected_item: table.insert("", table.index(selected_item), values=("Location A", "Location B", "Location C")) else: table.insert("", "end", values=("Location A", "Location B", "Location C"))
# deletes a row at the selected location (If there is no selected row, delete the last row) def deleteRow(): selected_item = table.focus() if selected_item: table.delete(selected_item) else: last_item = table.get_children()[-1] table.delete(last_item)
# hideRow hides the selectedRow. Do nothing if there is no selected row. def hideRow(): selected_item = table.focus() if selected_item: index = table.index(selected_item) hidden_rows.append((index, selected_item, table.item(selected_item)["values"])) table.delete(selected_item)
# showAll shows all rows. def showAll(): for index, item, values in hidden_rows: table.insert("", index, item, values=values) hidden_rows.clear()
# Builds the GUI. # create three buttons btnAdd (button label = "Add"), btnInsert (button label = "Insert"), btnDelete # (button label = "Delete"), btnHide (button label = "Hide") and btnShowAll (button label = "Show All")) at 1st row # Create a table with 3 columns and 5 rows initialized with arbitrary data root = tk.Tk() root.title("Table Manipulation")
frame = tk.Frame(root) frame.pack()
# Creates buttons btnAdd = tk.Button(frame, text="Add", command=addRow) btnAdd.grid(row=0, column=0) btnInsert = tk.Button(frame, text="Insert", command=insertRow) btnInsert.grid(row=0, column=1) btnDelete = tk.Button(frame, text="Delete", command=deleteRow) btnDelete.grid(row=0, column=2) btnHide = tk.Button(frame, text="Hide", command=hideRow) btnHide.grid(row=0, column=3) btnShowAll = tk.Button(frame, text="Show All", command=showAll) btnShowAll.grid(row=0, column=4)
# Creates a table table = ttk.Treeview(root, columns=("A", "B", "C"), show="headings") table.heading("A", text="Column 1") table.heading("B", text="Column 2") table.heading("C", text="Column 3") table.pack()
# Initialize table with arbitrary data for i in range(5): table.insert("", "end", values=(f"Data {i+1}A", f"Data {i+1}B", f"Data {i+1}C"))
root.mainloop() |
| Result |
|
|
Followings are the methods of the table component (Treeview) that are used in the example code .
insert(parent, index, iid=None, **kw): This method is used to insert a new item into the table. It takes the following parameters:
- parent: The parent item's ID. If it's an empty string, it means the new item will be inserted at the top level.
- index: The position at which the new item will be inserted. It can be an integer or the string "end".
- iid: The item's ID. If not provided, the ID will be generated automatically.
- **kw: Keyword arguments, such as values, which is a tuple containing the values for each column of the new item.
focus(): This method returns the ID of the currently focused item or an empty string if no item is focused.
index(item): This method returns the position (index) of the given item within its parent.
delete(item): This method deletes the specified item from the table. It takes the item ID as an argument.
get_children(item=None): This method returns a tuple containing the IDs of the specified item's children. If the item parameter is not provided or is an empty string, it returns the top-level items.
exists(item): This method checks if the specified item exists in the table. It returns True if the item exists and False otherwise.
item(item, option=None, **kw): This method is used to get or set item options, such as the item's values. It takes the following parameters:
- item: The item's ID.
- option: The option to get or set. If not provided, the method returns a dictionary containing all the item's options.
- **kw: Keyword arguments used to set the item options.
move(item, parent, index): This method moves the specified item to a new position within its parent. It takes the following parameters:
- item: The item's ID.
- parent: The parent item's ID. In this case, it's an empty string, which means the item will be moved within the top level.
- index: The new position (index) of the item.
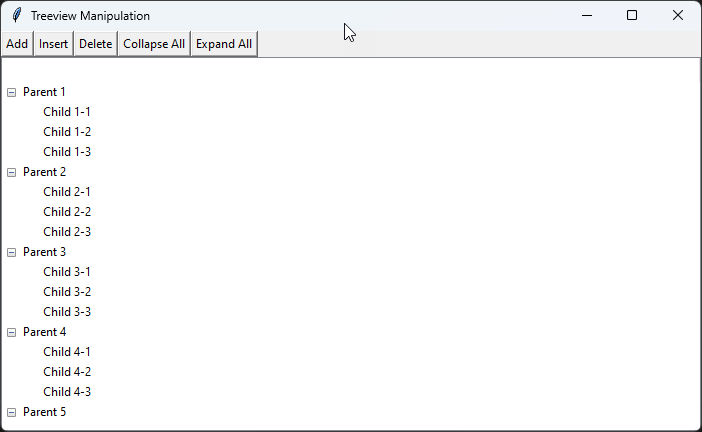
I am going to show you a script that does the following things to demonstrate basic procedures for Treeview and manipulations.
1. create three buttons btnAdd (button label = "Add"), btnInsert (button label = "Insert"), btnDelete (button label =
"Delete"), btnCollapseAll (button label = "Collapse All") and btnExpandAll (button label = "Expand All")) at 1st row
2. Create a Treeview with 5 first level node and each of the first level nodes has 3 child nodes
3. Create event handler for btnAdd (addNode), btnInsert(insertNode), btnDelete (deleteNode), btnCollapseAll
(collapseAll), btnExpandAll (expandAll) that does followings
i) addNode add a node at the end of the current parent node and set an arbitrary value to it
ii) insertNode insert a node at the selected location and fill it out with an arbitrary location. (If there is no selected
node, insert it at the last node)
iii) deleteNode delete a node at the selected location (If there is no selected node, delete the last node)
iv) collapseAll, collapse all nodes.
v) expandAll expands all nodes.
4. Make it editable when I doubleclick the node
| Script |
|
import tkinter as tk from tkinter import ttk
# add a node at the selected node and label it as "New Node" def addNode(): selected_item = tree.focus() if selected_item: tree.insert(selected_item, "end", text="New Node") else: tree.insert("", "end", text="New Node")
# insert a node at the selected node and label it as "New Node" def insertNode(): selected_item = tree.focus() if selected_item: parent = tree.parent(selected_item) tree.insert(parent, tree.index(selected_item), text="New Node") else: tree.insert("", "end", text="New Node")
# Delete the selected node def deleteNode(): selected_item = tree.focus() if selected_item: tree.delete(selected_item) else: last_item = tree.get_children()[-1] tree.delete(last_item)
# Collapse all the node. Walk through every node and apply 'open=false' to the node def collapseAll(): for item in tree.get_children(): tree.item(item, open=False)
# Expand all the node. Walk through every node and apply 'open=true' to the node def expandAll(): def expand_children(node): tree.item(node, open=True) for child in tree.get_children(node): expand_children(child)
for item in tree.get_children(): expand_children(item)
# make the node editable when it is doubleclicked def on_double_click(event): item_id = tree.identify_row(event.y) if not item_id: return
column_id = tree.identify_column(event.x) x, y, width, height = tree.bbox(item_id, column_id)
entry.place(x=x, y=y+height+5, anchor='nw', width=width, height=height) entry.focus_set()
entry.delete(0, tk.END) entry.insert(0, tree.item(item_id, 'text'))
def save_changes(event): tree.item(item_id, text=entry.get()) entry.place_forget()
entry.bind('<Return>', save_changes) entry.bind('<FocusOut>', save_changes)
# Builds the GUI. # Create three buttons btnAdd (button label = "Add"), btnInsert (button label = "Insert"), btnDelete (button label = # "Delete"), btnCollapseAll (button label = "Collapse All") and btnExpandAll (button label = "Expand All")) at 1st row # Create a Treeview with 5 first level node and each of the first level nodes has 3 child nodes root = tk.Tk() root.title("Treeview Manipulation") root.geometry("700x400")
frame = tk.Frame(root) frame.pack(fill="x")
# Creates buttons btnAdd = tk.Button(frame, text="Add", command=addNode) btnAdd.grid(row=0, column=0) btnInsert = tk.Button(frame, text="Insert", command=insertNode) btnInsert.grid(row=0, column=1) btnDelete = tk.Button(frame, text="Delete", command=deleteNode) btnDelete.grid(row=0, column=2) btnCollapseAll = tk.Button(frame, text="Collapse All", command=collapseAll) btnCollapseAll.grid(row=0, column=3) btnExpandAll = tk.Button(frame, text="Expand All", command=expandAll) btnExpandAll.grid(row=0, column=4)
# Creates a Treeview tree = ttk.Treeview(root) tree.pack(fill="both", expand=True) tree.bind('<Double-1>', on_double_click)
entry = tk.Entry(root) entry.place_forget()
# Initialize tree with arbitrary data for i in range(5): parent = tree.insert("", "end", text=f"Parent {i+1}") for j in range(3): tree.insert(parent, "end", text=f"Child {i+1}-{j+1}")
root.mainloop() |
| Result |
|
|
Followings are the methods of the table component (Treeview) that are used in the example code . Try to understand the example code above based on the following description.
insert(parent, index, iid=None, **kw): Inserts a new item into the treeview.
- parent : the ID of the parent item where the new item will be inserted. To insert at the top level, use an empty string. index : determines the position of the new item among its siblings.
- iid : (Optional) allows you to set a unique ID for the new item.
- **kw : set various item options, such as text, values, image, tags, etc.
delete(*items): Removes one or more items from the treeview. You need to provide the item IDs as arguments.
focus([item]): If called without arguments, returns the ID of the currently focused item. If called with an item parameter, sets the focus to the specified item.
selection([items]): If called without arguments, returns a tuple of the currently selected items. If called with a list of items, sets the selection to the specified items.
item(item, option=None, **kw): Retrieves or modifies item options. If called with only the item parameter, returns a dictionary of the item's options. If called with the item and option parameters, returns the value of the specified option for the given item. If called with keyword arguments, sets the specified options for the item.
get_children([item]): Returns a tuple of child items for the specified item. If called without arguments, returns the top-level items.
parent(item): Returns the parent item of the specified item. If the item is at the top level, an empty string is returned.
index(item): Returns the index of the specified item among its siblings.
move(item, parent, index): Moves the specified item to a new parent and position.
detach(item): Detaches the specified item from the treeview, but does not delete it. The item can be reinserted later using the move method.
tag_configure(tagname, **kw): Configures the appearance of items with a specific tag. You can use keyword arguments to set various options, such as background color, foreground color, font, etc.
tag_has(tagname, [item]): If called without an item parameter, returns a tuple of items that have the specified tag. If called with an item parameter, returns True if the item has the specified tag, and False otherwise.
get_children(item=None): Returns a list of the children for a given item. If item is not provided or is set to None, it returns the top-level items in the treeview. If item is specified, it returns the child items of the given item.
identify_row(y): This method takes a y coordinate value as input and returns the ID of the treeview item that is displayed at the given y coordinate. If there's no item at the specified coordinate, it returns an empty string.
identify_column(x): Similar to identify_row(), this method takes an x coordinate value as input and returns the ID of the treeview column that is displayed at the given x coordinate. If there's no column at the specified coordinate, it returns an empty string.
bbox(item, column=None): This method returns a 4-tuple containing the bounding box coordinates (x, y, width, height) of the specified item. If the column parameter is provided, the bounding box coordinates for that specific column of the item are returned. If the item or the specified column is not currently visible, it returns an empty tuple.
| Script |
| Result |
| Script |
| Result |
| Script |
| Result |