|
IP/Network |
|||||||
|
NAT (Network Address Translation)
NAT means change IP address in a IP packet to another address. It is a technique that modifies the source and/or destination IP addresses of packets as they pass through a router or firewall.
We use Network Address Translation (NAT) for several reasons as follows,
IP address conservation: NAT allows multiple devices on a private network to share a single public IP address, which helps conserve the limited number of available public IP addresses.
Security: NAT provides an additional layer of security by hiding the private IP addresses of devices on the internal network from the public internet. This makes it more difficult for attackers to identify and target specific devices on the network.
Flexibility: NAT enables organizations to use private IP addresses on their internal networks, which are not routable on the internet, while still allowing access to the internet. This provides greater flexibility in network design and management.
Simplified network management: NAT allows organizations to easily manage their network infrastructure by consolidating multiple private IP addresses into a single public IP address. This simplifies network management and reduces the need for complex routing configurations.
There are two types of NAT:
Static NAT: This is where a public IP address is permanently assigned to a device on the private network, allowing that device to always have the same IP address when communicating with the internet.
Dynamic NAT: In this method, the router assigns a public IP address from a pool of available addresses to a device on the private network when it requests access to the internet. Once the device is finished using the internet, the public IP address is released back into the pool for use by other devices.
A common way is to configure NAT in Windows is to use ICS (Internet Connection Sharing). I would suggest you to check out my note on ICS to understand how ICS works. Basically ICS is a type of NAT. If you get detailed understanding on how ICS works, you would have pretty clear picture on how NAT works in general.
ICS allows a computer with multiple network interfaces to share its internet connection with other devices on the network by acting as a NAT gateway.
When ICS is enabled, the computer creates a network bridge between the two network interfaces, and the NAT functionality is automatically configured to allow devices on the private network to access the internet through the computer's internet connection.
With ICS, the Windows computer is acting as a gateway for the private network, sharing its internet connection with other devices on the network.
However, there are slight difference between NAT in general and ICS. It is the scope of the sharing.
NAT allows multiple devices on a private network to share a single public IP address, while ICS allows a single computer to share its internet connection with other devices on the network. With NAT, the router or firewall acts as the gateway between the private network and the internet, while with ICS, a computer on the network is acting as the gateway.
Additionally, ICS is a built-in feature of Windows operating systems, while NAT is a more general networking concept that can be implemented on various network devices and is not limited to Windows operating systems.
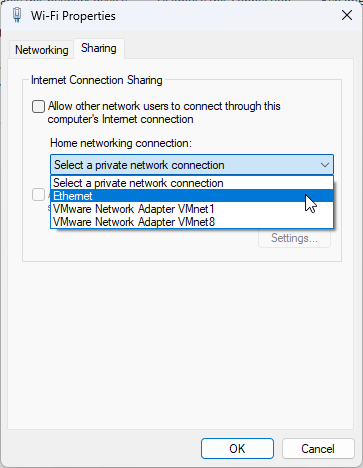
You can setup ICS via the setup windows as shown below.
You may configure NAT setting on Windows in command line as follows :
One specific example is as follows : This command configures the private network to use IP addresses between 192.168.0.10 and 192.168.0.50 with a subnet mask of 255.255.255.0.
Once these commands are executed, the Windows computer will act as a NAT gateway, allowing devices on the private network (connected to the "Local Area Connection" interface) to access the internet through the "Wireless Network Connection" interface. Note that the interface names and IP addresses used in this example are purely imaginary and will likely not match your own network configuration.
Here's an example configuration for static NAT on Windows, using the interface named "Ethernet" and mapping a public IP address of 203.0.113.10 to a private IP address of 192.168.1.10:
Since the general concept of NAT is already explained above and it is same in Linux as well, I would not talk any further about the concept and just provide some examples here.
NOTE 1 : We need to use 192.168.0.0/24 in [iptables -A FORWARD -i eth1 -s 192.168.0.0/24 -j ACCEPT] to allow traffic to pass through the firewall from the local network with source IP addresses in the range 192.168.0.0/24
NOTE 1 : Why we need to disable ip_forwarding at the first step ?
Disabling IP forwarding is necessary for Static NAT because with Static NAT, the IP address translation is performed only once when the mapping is created, and all subsequent traffic to and from the internal host uses the same mapped IP address. If IP forwarding is enabled, then the translated IP address may be changed as the packet is forwarded, resulting in unpredictable behavior. By disabling IP forwarding, you ensure that the translated IP address remains the same throughout the duration of the session, and that the Static NAT mapping works as expected
NOTE 2 : why do we need to use 192.168.0.0/24 in [iptables -A FORWARD -i eth1 -s 192.168.0.0/24 -j ACCEPT] instead of 192.168.0.1 ?
This command is still needed to allow traffic to pass through the firewall, but the IP addresses of the local network have not changed. Therefore, the same range of IP addresses, 192.168.0.0/24, is used to identify the source of the traffic. The IP address 192.168.0.1 is the internal IP address of the device that is being NATed to the public IP address. It is not used in the FORWARD rule because it is not a range of IP addresses that traffic can come from. Instead, it is the destination IP address of the incoming traffic that is being translated by the DNAT rule.
NOTE : How to check current NAT setting ?
Reference
|
|||||||