|
ADB
ADB stands for Android Debug Bridge. It is mainly used to control various SmartPhone functionality using control command. If you are familiar with AT command, you may think ADB is similar to AT Command but it has much wide/powerful functionality than AT command, but ADB works only for Android OS whereas AT command should be supported by all chipset. If you are familiar with GPIB, you
can think of ADB as a Android specific GPIB. Basic purpose of ADB is similar to AT Command or GPIB, but it has much wider flexibility.
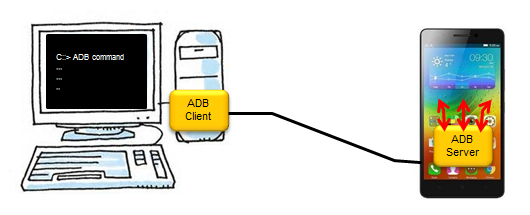
ADB works in a client-server model as shown below. ADB server is in Mobile phone (Android OS) and ADB Client is supposed to be installed on the control PC. If you install the device driver for a specific SmartPhone, it would install ADB interface device driver, but this is up to the SmartPhone maker. Some Smartphone may not support ADB even though it is Android phone.
Followings are the topics that will be covered in this page.
First thing to keep in Mind
The first things I want you to keep in mind before you seriously think of getting into this area are listed as below (this is purely my personal opinion)
i) Android shows pretty wide varieties of behavior depending on OS version
ii) Even with the same Android version, each UE maker may implement a same function in different way
Because of item i), some command in this page may or may not work with your device. Also, you would search a lot of tips and examples from web search. Even those tips or examples may or may not work with your device.
Most of the examples tried out in this page is based on a device that is using Android version 5.1. (Check your Android Version. See Get Android Version section to see how to do this)
Because of item ii), some command in this page may or may not work with your device even though you are using the same version of Android as mine. For example, if you want to set something about WiFi Setting and if the specific mobile phone maker implemented the WiFi setting in their own App in stead of default Anroid functionality.
In this case, you have to figure out which App and which module you have to play with to do what you want to do. This is very tedious and time-consuming job, but it can be an interesting engineering (reverse engineering) things you may enjoy :)
How can I set up ADB ?
< Install the USB Driver >
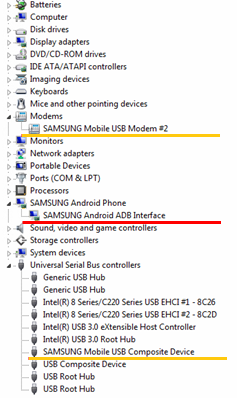
The first thing you have to check if a device support ADB is to check if the ADB Interface driver is installed/activated in your Device Manager. Following is one example driver installed for SamSung GS4. (I think you can download from the internet the device driver for any phones)
< Permit USB Debugging on UE >
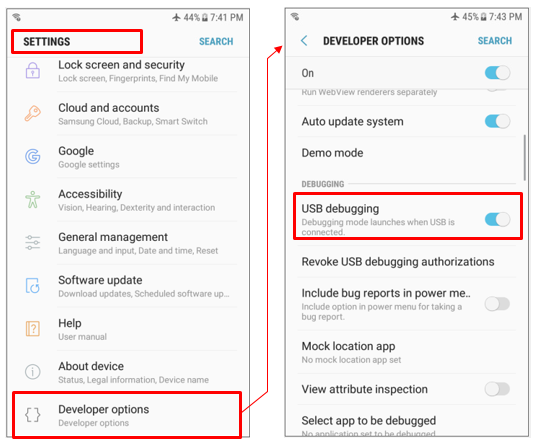
In order to use ADB, the USB Debugging capability should be allowed. This USB Debugging Capability is in Developer Option. However, Developer Mode is not enabled by default. In this case, you need to enable the Developer Option first. The way to enable the developer option may be a little different depending on the device (Phone) that you are using. If you are uisng SamSung Galaxy phone,
refer to How do I turn on the Developer Options menu on my Samsung Galaxy device? to enable Developer Option.
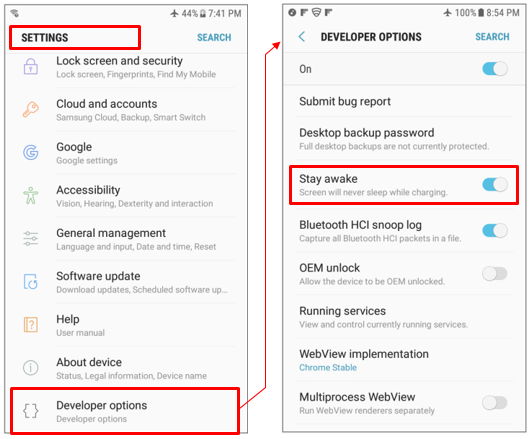
Once you get [Developer Option] menu in [Settings], enable [USB Debugging] As shown below.
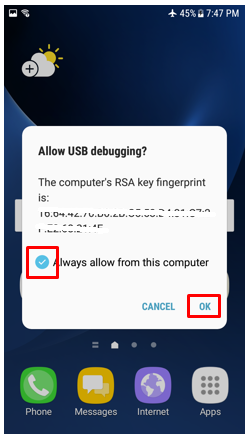
After you enabled [USB Debugging], connect the device (Phone) to the PC with USB cable. Then you would get following pop-up. Then tap [OK] button (NOTE : If you use the same device often with your PC, selecting 'Always allow from this computer' would be good. Then the device would not asking this again with the PC it is connected now).
< Check ADB Connection >
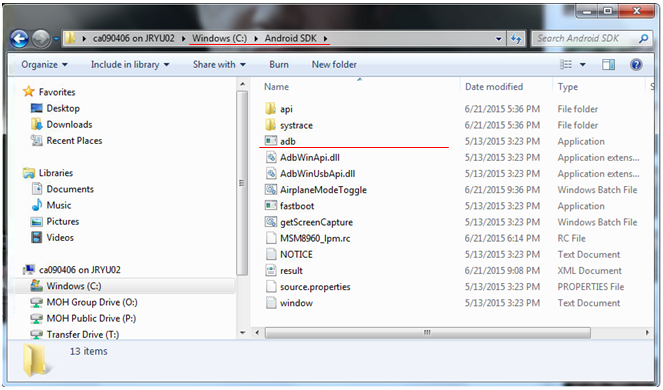
Then download Adroid SDK with ADB from Android development site. Following is where I installed it but the installation package.(Note : the location of the installed driver may be different depending on the specific SDK you have downloaded.)
Then run 'adb devices' on command prompt. If you see any device serial number as a result, it means ADB is properly connected.
< Set Display Always On >
One important thing that you should know is that the Display should be ON for many ADB commands. If the display goes off for battery saving, it is very hard to get it back ON by ADB command (I personally tried many things to do this but failed). So I strongly recommend you to set the Display to be always ON. You can do the 'Always on' setting in Display settings in some UE, but in some
UE you cannot set 'Always On' on Display setting. For example, in case of SamSung GS, you can set the 'Always On' only in Devloper Options as shown below.
Where can I find key code ?
A lot of User Operation control is done by sending a specific Key code to UE as shown in the following example.
adb shell input keyevent KEY_CODE_NUM
// e.g, "adb shell input keyevent 22" send the keycode 22 to UE
So it is good know that how to send Keycode and understand what is the meaning of each key code.
One of the issues with these key code would be that the meaning may change depending on Android version, you may need to check if the specific key code works for your device with a specifc Android version.
Also UE vendor may assign a specific key code to select a certain options in their GUI. It means you would need some UE specific information in some cases.
Where can I find Multi-Touch (MT) Protocol/Event Description ?
You would need to refer to these documents very often in order to understand the meaning of events you can get by 'adb getevent' command.
ADB Commands
Followings are the list of ADB command or a sequence of commands to perform a certain operation. Some of the operation (like KeyEvent operation) may not give you the exact the same result as I have depending on what kind of device you are using. Take the example only as a starting point and it is up to you to do fine-tuning to achieve your goal.
< Querying the Connected Device >
|
adb devices
// returns the list of the device that are connected to PC
// the return value is the serial number of the device (18660efd in this case is the serial number of the device)
// it can be used for basic connection check.
|
C:\Android SDK>adb devices
List of devices attached
18660efd device // if you see 'device' here, it means the device is physically connected
// and you are authroized to use ADB to control the device.
// if you see 'unauthorized' here, it means the device is physically connected,
// but you are not authorized to controll it with ADB. You have to authorize it in
// device setting in that case.
|
< Getting admin access/Getting root access >
ADB is very smilar to Linux in many ways.. but getting the super user permission is a little bit different from 'su' command in Linux. In case of Linux, you might have used 'su' very often when you try to execute some command that is not allowed for your current account or try to get access to some devices. But in ADB, if you do 'su' you may get some error or would not
give you the result that you expected even when it does not cause any error.
The common solution for this kind of case in ADB would be 'adb root'.
|
adb root
// give you root level permission
|
|
|
< Get the Device Serial Number >
|
adb get-serialno
// returns the serial number of the device
// when you have multiple devices connected to a single PC, you can send the command to a specific device
// using this serial number
|
|
|
< Get Android OS Version >
|
adb shell getprop ro.build.version.release
// returns version of the android OS running on the device
|
|
|
< Get ADB Status >
|
adb get-state
// returns the current status of the phone that is connected to PC
|
|
|
< Sending ADB command to a specific device >
|
adb -s <serial number> get-state
// returns the current status of the phone with a specific serial number that is connected to PC
|
|
|
< Executing a shell command >
|
adb shell
// with this command, you can run linux shell command on the phone
// following is an example of running 'ls' command
|
|
|
< Copying a file from the device to your PC >
|
adb pull file_on_device
// copy a file from the device to your control PC
|
C:\Android SDK>adb pull MSM8960_lpm.rc
102 KB/s (4721 bytes in 0.045s)
C:\Android SDK>dir
Volume in drive C is Windows
Volume Serial Number is 4AC4-BD96
Directory of C:\Android SDK
06/21/2015 06:14 PM <DIR> .
06/21/2015 06:14 PM <DIR> ..
05/13/2015 03:23 PM 819,200 adb.exe
05/13/2015 03:23 PM 96,256 AdbWinApi.dll
05/13/2015 03:23 PM 60,928 AdbWinUsbApi.dll
06/21/2015 05:36 PM <DIR> api
05/13/2015 03:23 PM 160,768 fastboot.exe
05/13/2015 03:23 PM 48 getScreenCapture.bat
06/21/2015 06:14 PM 4,721 MSM8960_lpm.rc
05/13/2015 03:23 PM 256,067 NOTICE.txt
05/13/2015 03:23 PM 42 source.properties
06/21/2015 05:36 PM <DIR> systrace
05/13/2015 03:23 PM 20,559 window.txt
9 File(s) 1,418,589 bytes
4 Dir(s) 6,662,225,920 bytes free
|
< Check Airplane mode status - Checking whether the Airplane mode is On or Off >
|
adb shell settings get global airplane_mode_on
// Query the status of Airplane Mode of the device.
// If the device returns '1', it means Airplane Mode is ON
// If the device returns '0', it means Airplane Mode is OFF
|
|
|
< Check WiFi status - Checking whether the WiFi is On or Off >
|
adb shell dumpsys wifi | find "Wi-Fi"
// Query the status of WiFi of the device.
// This is not the WiFi specific command. It is just execute dumpsys command to give you all the system
// information and then search any information which contains the string "Wi-Fi".
// I used "| find <string>" since I was running this on Windows Command Line Window.
// If you are running this on Linux command line, you would use "| grep <string>"
// you may need to use different keywords in the search <string> part depending on your device.
// Try first "shell dumpsys" and see if it can give you the information about wifi
// (If you confirm it would give you the wifi into) then try "shell dumpsys wifi" and to figirue what kind of
// <string> would give you the best information about the wifi status
|
|
|
< Performing Key Operation (GUI button operation) >
|
adb shell input keyevent KEY_CODE_NUM
// sending a specific KEY_CODE_NUM to UE to simulate a specific Key Press
// Refer to 'Where Can I find Keycode' for further details
|
|
|
< Performing Airplane Mode On or OFF >
: In most device, this operation can be done by multiple steps (As far as I know, there is no single adb command that can perform this operation). The exact sequence varies depending on Device model, but they all use similar logic as follows.
i) Execute adb command to switch to 'Device Settings -> Airplane Mode' menu
ii) Performing a sequence of Key operation to click Airplane mode option
Following is one example. This is just an example. This may or may not work with your device depending on what kind of GUI pops up when you tap on Airplane mode option. Refer to 'Where can I find keycode' section to figure out the meaning of each key code.
C:\Android SDK> adb shell am start -a android.settings.AIRPLANE_MODE_SETTINGS
// Go to Settings->Airplane Mode Menu
C:\Android SDK> adb shell input keyevent 66 // Perform [ENTER] Key press.
//This
is same as 'your finger tapping on the option'
C:\Android SDK> adb shell input keyevent 22 // Perform [RIGHT] Key (Shift Right).
//
This step would vary depending on GUI
C:\Android SDK> adb shell input keyevent 66 // Perform [ENTER] Key press.
//
This is same as 'your finger tapping on the option
|
|
Note 1 : As you see in this example, most of the device does not provide any single adb command to do Airplane mode on/off. The operation is basically replay the tap and arrow button operation on device GUI. It means that if you have multiple devices with different GUI design, you would
need to go through different sequence of ADB commands. But for some UE, running the same ADB sequence would lead you to different outcome depending on the initial status of the GUI.
Note 2 : As a workaround for the issues described in Note 1. You may create a shortcut menu(icon) to Airplane mode setup menu and specify the pixel coordinate and do 'tap' adb. However, in this case if somebody changes the location of the shortcut icon or change the resolution of the
UE screen, it would not work.
So, personally I haven't find any ADB solution for stable/repeatable airplane mode on/off that would work for all the devices. It will be very appreciated if anybody has any good idea on this issue :)
|
< Making a voice call >
|
adb shell am start -a android.intent.action.CALL tel:<PhoneNumber>
// Make a phone call to <PhoneNumber>
|
|
|
< Taking a Screenshot >
|
adb shell screencap -p file_path_name
// Take a screenshot and save it into a file specified in file_path_name
// once the screenshot is save, you can copy the image file into your control pc by 'adb pull' command
// as shown in the following example
|
C:\Android SDK> adb shell screencap -p /sdcard/screen.png // Save the screenshot into screen.png
// give a couple of seconds delay here to give enough time to save the file
C:\Android SDK> adb pull /sdcard/screen.png // Copy the saved file into your PC
|
< Capturing Realtime Events >
|
adb shell getevent
// Display the list of events types that can be captured
// Captures the all the events that belong to the types of the events listed above
adb shell getevent event_type
// Capture the only events that is specified in 'event_type'
|
|
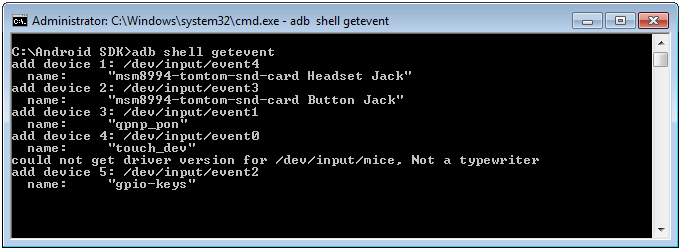
Example 1 : Capturing the events for all the device.
i) type in adb shell getevent (not pressed Enter key yet)

ii) Press [Enter] key and following message is getting displayed and wait for events. The list of the event and device-event number mapping may vary depending on the device and internal configuration you are using. So don't try to remember the event number blindly. Always try this commands for your own device.
iii) I just touched one point on the screen with my finger and got the following long list of events. (Just a single touch is generating this kind of long list of events)
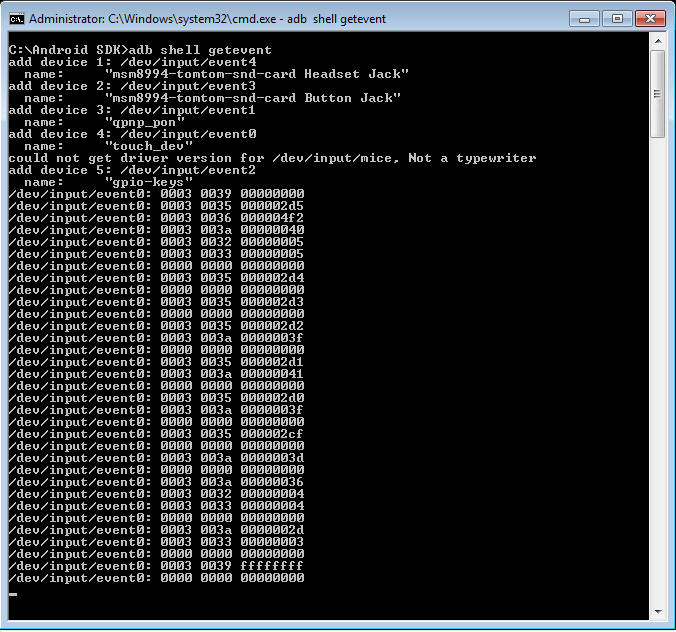
iv) Press 'Ctrl + C' to stop the event capture
Example 2 : Capturing the events for the specific device and specific events
i) type in adb shell getevent /dev/input/event0 (not pressed Enter key yet)

ii) Press [Enter] key and wait for events.

iii) I just touched one point on the screen with my finger and got the following long list of events. (Just a single touch is generating this kind of long list of events)
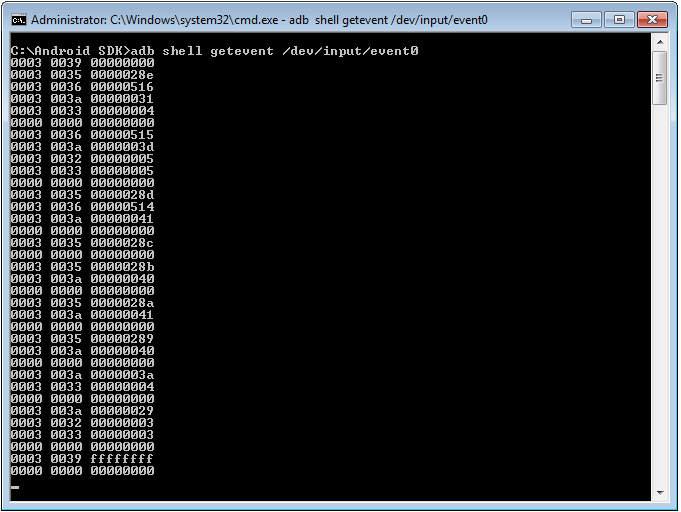
iv) Press 'Ctrl + C' to stop the event capture
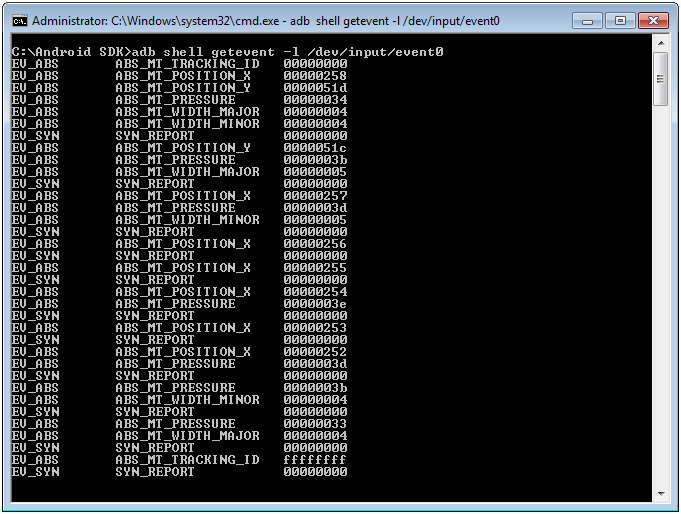
Example 3 : Capturing the events and displaying in human readable form
If you run the command with '-l' option, you can get the event displayed in more human readable form as shown below.
If you want to know the descriptions of each option, run 'adb shell getevent --help'
|
< Performing Tap >
|
adb shell input tap x y
// Tap at the location of (x,y). x and y are decimal number in the unit of pixels from top left corner of the screen
|
|
|
< Performing Swipe >
|
adb shell input swipe x1 y1 x2 y2
// Swap from (x1,y1) to (x2,y2). x1,y1,x2,y2 are decimal number in the unit of pixels from top left corner of the screen
|
|
|
< Typing a text >
|
adb shell input text text_string
// Type a text_string
|
|
|
One of the issue of this command is that it would not handle white space.
For example, if you type in as follows .. this text would not show up at all on the UE. (You want to have 'Text1 Text2' show up on UE)
How to handle this issue ? There are a couple of solution.
One solution is to use '\'
Then you would see 'Text1Text2' on your UE screen. You see the text is sent but the space is gone. What if I need to have the space remaining in the middle ?
The solution is to use '\s' as follows.
Now you would see 'Text1 Text2' displayed on your UE screen.
< Running (executing/launching) a package >
|
adb shell am start -p <package>
// Run a package
// Question is how to figure out the exact package name to do what I want to do.
// you would need some investigation or hecking (?) to find them out.
// "adb shell pm list" command and the tool "aapt" can be a good tool for this investigation
|
|
|
< Running (executing/launching) an application >
|
adb shell am start -a <application>
// Run an application
// Question is how to figure out the exact application name to do what I want to do.
// you would need some investigation or hecking (?) to find them out.
// "adb shell pm list" command and the tool "aapt" can be a good tool for this investigation
|
|
|
< Running (executing/launching) a component >
|
adb shell am start -n <component>
// Run a component. (Component is a small module contained within a package)
// Question is how to figure out the exact component name to do what I want to do.
// you would need some investigation or hecking (?) to find them out.
// "adb shell pm list" command and the tool "aapt" can be a good tool for this investigation
|
|
|
< Getting the list of the installed package >
: In many case, you need to know on what kind of packages are already installed in the device for various automation. Recently I noticed a lot of GUI components are implemented as vendor specific GUI rather than as a default framework. So finding out which packages are performing which component of GUI operation is getting more and more important. This example shows you how to get the
list of installed on a device.
|
adb shell pm list packages
// this gives you the list of the package in short form as shown below. It does not give you the full path of
// the packages
// you can run these packages with 'adb shell am start -a' command
|
C:\Android SDK> adb shell pm list packages
// you would have different result from your device. also 'uemaker', 'chipsetmaker' is the part that I changed.
package:com.hy.system.fontserver
package:com.android.UEMAKERSetupWizard
package:com.uemaker.videotool
package:com.gd.mobicore.pa
package:com.google.android.youtube
......
package:com.uemaker.ia.task.informant
package:com.google.android.play.games
package:com.uemaker.lginstallservies
package:com.google.android.apps.magazines
package:com.android.bluetooth
package:com.chipsetmaker.timeservice
package:com.chipsetmaker.atfwd
package:com.android.providers.contacts
package:com.uemaker.snappage
package:com.uemaker.servicemenu
package:com.android.captiveportallogin
package:com.uemaker.qmemoplus
|
|
adb shell pm list packages -f
// this gives you the list of the package in short form as shown below. It gives you the full path of
// the packages
|
C:\Android SDK> adb shell pm list packages -f
// you would have different result from your device. also 'uemaker', 'chipsetmaker' is the part that I changed.
// green part is the path(physical location) of a package
// red part is the name of the package
// pink part is component name of the package. this is the name you have to use in 'adb shell am start -a'
package:/system/priv-app/FontServer/FontServer.apk=com.hy.system.fontserver
package:/system/priv-app/UEMAKERStartupwizard/LGStartupwizard.apk=com.android.UEMAKERSetupWizard
package:/system/priv-app/UEMAKERVidClip/UEMAKERVidClip.apk=com.uemaker.videotool
package:/system/app/RootPA/RootPA.apk=com.gd.mobicore.pa
package:/system/app/YouTube/YouTube.apk=com.google.android.youtube
.....
package:/system/priv-app/UEMAKERSnapPage/UEMAKERSnapPage.apk=com.uemaker.snappage
package:/system/app/servicemenu/servicemenu.apk=com.uemaker.servicemenu
package:/system/app/CaptivePortalLogin/CaptivePortalLogin.apk=com.android.captiveportallogin
package:/data/preload/UEMAKERQMemoplus/LGQMemoplus.apk=com.uemaker.qmemoplus
|
|
adb shell pm list packages -f | find "string"
// this gives you the list of the package in the detailed form as shown below. It gives you the full path of
// the packages that contains "string" in its name
|
C:\Android SDK> adb shell pm list packages -f | find "youtube"
// green part is the path(physical location) of a package
// red part is the name of the package
// pink part is component name of the package. this is the name you have to use in 'adb shell am start -a'
package:/system/app/YouTube/YouTube.apk=com.google.android.youtube
|
< Browsing - using Chrome >
To perform the procedure explained here, you are supposed to have Chrome installed on your device. Even when you have the Chrome installed on your device, the commands listed here may or may not work on your device depending on the version of Android OS and the version of Chrome. What I want to tell you is just overall concept of manipulating an application like browser. You may need
more detailed investigation about the application on your own device.
|
adb shell am start -n < modulename_for_chrome>
adb shell am start -a android.intent.action.VIEW http://<url of web page >
// I used the two commands in sequence to launch the chrome and open the web pages I want to open
// the question is 'how can I figure out the modulename_for_chrome' and how did I figure out
// I need to use "adb shell am start -a android.intent.action.VIEW" to open up the web pages.
// I used 'logcat -d' shell comman to figure out all of these tricks.
|
c:\Android SDK>adb shell am start -n com.android.chrome/com.google.android.apps.chrome.Main
// This would launch the Chrome application and you would not see any document in it.
// You may see some document error in the display
// Anyway if you see following result, you can say the command is working fine.
Starting: Intent { cmp=com.android.chrome/com.google.android.apps.chrome.Main }
c:\Android SDK>adb shell am start -a android.intent.action.VIEW http://www.sharetechnote.com
// with this command running, you would see the document displayed on Chrome display and you would see
// following Result string
Starting: Intent { act=android.intent.action.VIEW dat=http://www.sharetechnote.com }
|
|